
How to Fix an iPhone Stuck on Charging Screen
If your iPhone stuck on charging screen and only shows the charging screen and won’t go past the battery icon, it’s frustrating — but you’re not alone. In most cases, this happens due to power delivery problems, software glitches, or faulty accessories. Below are proven fixes you can follow step by step to get your iPhone working again.
Quick Fix (Try First):
- Try a different Apple-certified cable and charger
- Clean the charging port gently
- Force restart your iPhone
- Plug into a wall outlet and charge 30+ minutes
- Connect to a computer and use recovery mode
Table of Contents
What Does It Mean When Your iPhone Is Stuck on Charging Screen?
So, what’s really happening when your iPhone just sits there, displaying the red battery icon, and refuses to budge? Let’s break this down step by step.
When your iPhone is working correctly, plugging it in after the battery dies should trigger the red battery icon and a charging cable graphic, indicating that it needs a moment to gather enough juice to power up. Usually, after a few minutes, the Apple logo pops up, and your phone begins to start. But when your iPhone stuck on battery charging screen persists for much longer, it signals a problem.
This issue is easy to spot. Here are the main symptoms:
- The red battery icon is stuck: The icon stays on the screen for several minutes or hours, and your iPhone doesn’t move past this stage.
- No Apple logo: After charging, you don’t see the Apple logo or hear the startup chime.
- No response to buttons: Pressing the power button or home button shows no reaction, or the screen just flashes the empty battery again.
- Charging sound doesn’t play: When you plug it in, you don’t always hear or feel the normal charging chime or vibration.
- Screen stays black after red battery: Sometimes the phone just stays black regardless of how long it charges.
Recognizing these signs helps you confirm that the iPhone charging screen stuck overnight is more than a simple dead battery or a device that’s just slow to start. Instead, something is preventing the iPhone from getting enough power to boot up iOS. It could be a minor issue, or it may need deeper troubleshooting, but don’t worry – there are proven fixes to try.

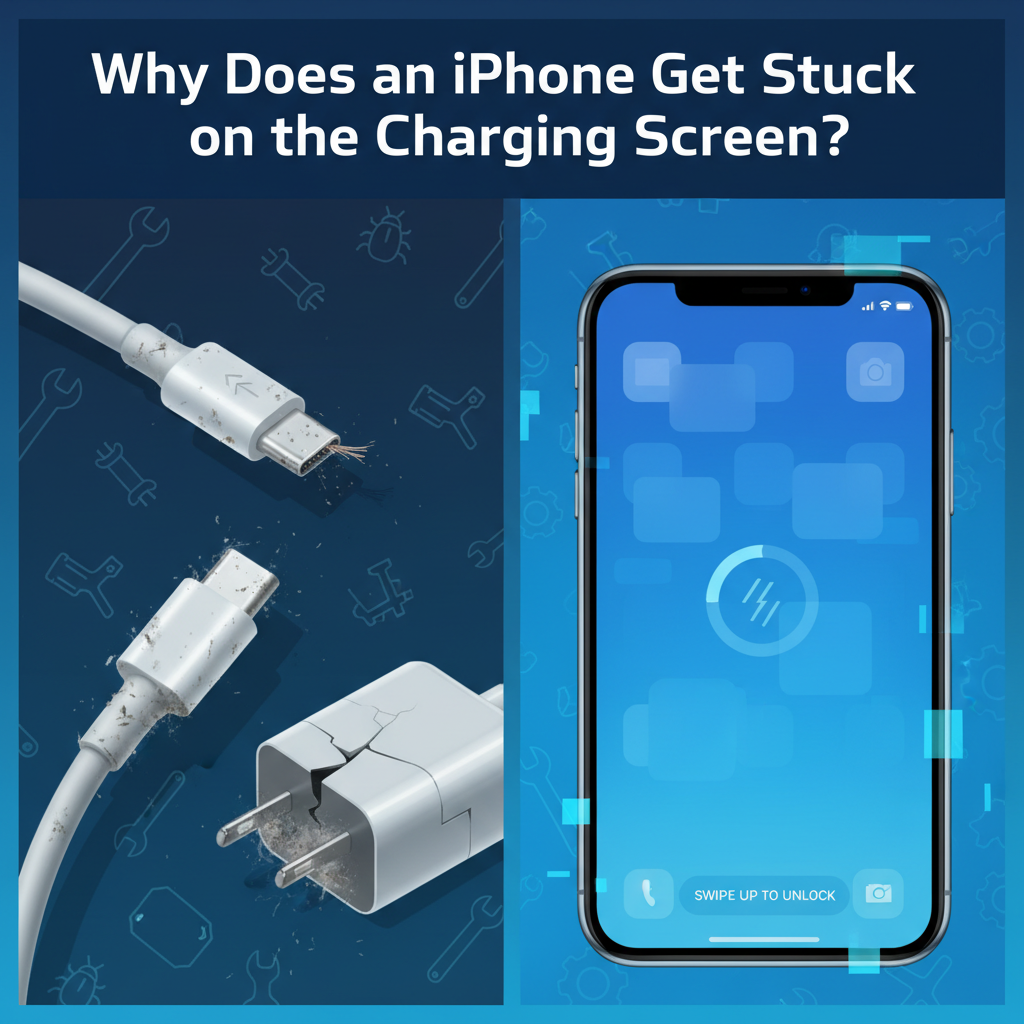
Why Does an iPhone Get Stuck on Charging Screen?
Before rolling up your sleeves, it’s important to understand why this happens. This problem isn’t rare, and understanding the causes will make it easier to fix and prevent in the future. Let’s go through the most frequent reasons step by step:
1. Faulty Charging Accessories
This is the number one culprit and is often overlooked. A frayed cable, worn-out USB adapter, or even dust and lint in the charging port can keep your iPhone from getting a solid connection. When you use third-party chargers or fast-charging bricks, your device might not get the right amount or type of power. Weak or unstable power tricks the iPhone into thinking it’s charging without actually topping up the battery.
Sometimes, simply switching to a new cable or an Apple-certified charger makes a world of difference. If your accessories are suspect, check out this article on charging issues for more info about similar problems.
2. Software Glitches
Every iPhone runs on iOS, a system designed to manage everything from running apps to communicating with the battery. But just like any software, it can freeze or crash. If the part of the software that displays or manages charging malfunctions, you might be stuck staring at a frozen charging screen, even though the battery is OK.
A common sign: your phone gave trouble during a previous update or act strangely before it shut down. These software hiccups are usually fixed with a force restart or a system refresh.
3. Hardware or Battery Problems
Lithium-ion batteries don’t last forever. Over years of use, batteries lose capacity and eventually struggle to hold a charge. If the battery is old, swollen, water-damaged, or physically damaged (such as from a hard drop), it might fail to provide enough power for your phone to start up – even when plugged in.
Charging port problems are very common too. Pocket lint, tiny bits of dust, or damage from forcing in the wrong cable all block clean power delivery. Some users even discover bent or corroded pins in the port after close inspection.
4. iOS Update Issues
Major iOS updates and even minor patches sometimes go wrong. If your iPhone shut down or lost power in the middle of updating, the system files may be left incomplete, resulting in the device catching in a boot loop or stuck on the charging screen. Sometimes, incompatible or corrupted firmware locks the boot process, requiring restoration via computer.
Learning more about how software and hardware interact is helpful. This deeper piece on charging issues covers many causes, including failed updates.
How to Fix an iPhone Stuck on Charging Screen (Step-by-Step)
Having your iPhone stuck on charging screen but not charging isn’t the end of the road. Follow these hands-on steps to get back up and running. This comprehensive section walks you through each solution, from the simplest to the most advanced.
1. Check Your Charging Accessories
Believe it or not, most of the time, it’s the little things! Damaged or fake charging accessories are notorious for causing headaches. Here’s how to systematically check your equipment:
- Cables: Look for obvious signs of damage like frayed insulation, bent prongs, or exposed wiring. Tug gently on both ends of the cable to check for weak spots.
- Power Adapter: Try plugging your adapter into a different wall outlet, or swap it for one you know works (for example, from another iPhone). Cheap third-party power bricks sometimes fail to provide enough power for charging.
- Charging Port: Hold your iPhone under a bright light. Use a non-metal toothpick or anti-static brush to clean out any lint, dust, or debris. Never poke hard or use sharp metal, as this can damage the pins.
- Different Combos: Try various combinations of cables, adapters, and outlets. Test your charger on another iPhone, or use a known working charger on your device.
- MFi Certification: Make sure you use “Made for iPhone” certified accessories. Look for the MFi symbol on packaging – uncertified chargers may fit but often under-perform or even damage your device over time.

If after all this, you blame your accessories, check out more fixes for charging accessories to pinpoint issues specific to cables and adapters.
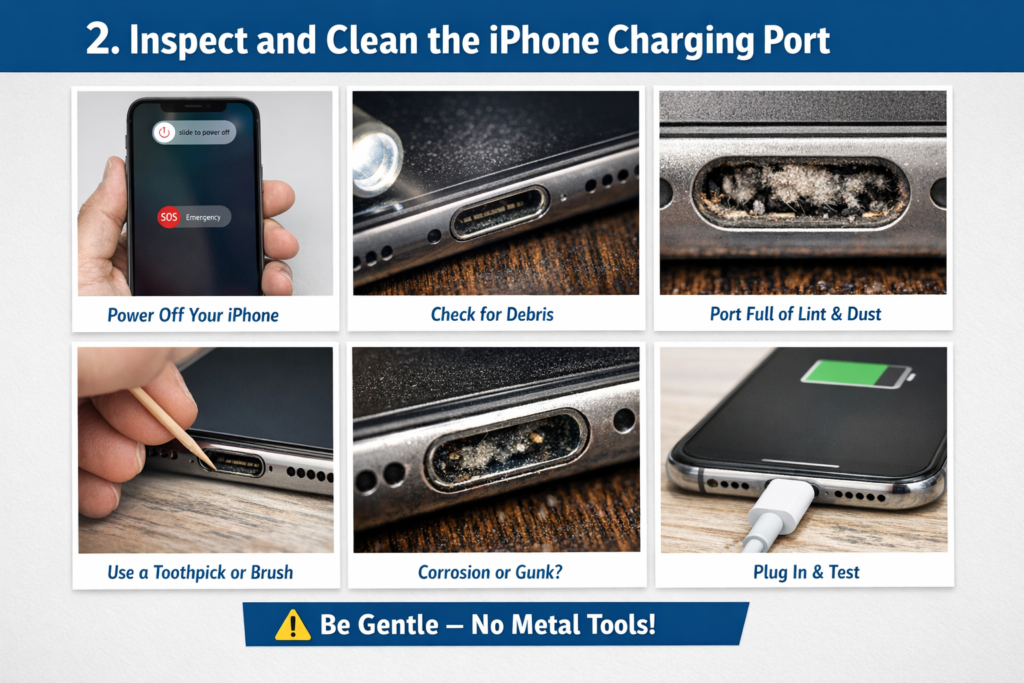
2. Inspect and Clean the iPhone Charging Port
As dust and debris collect in the pocket or purse, your iPhone’s charging port can become clogged. Even a tiny bit of lint can keep your cable from making a full connection. Without this secure link, your iPhone may not charge at all or will charge so slowly that it remains on the charging screen.
Here’s how to clean it safely:
- First, power off your device if possible.
- Shine a flashlight into the port to check for debris.
- Use a wooden or plastic toothpick, a SIM eject tool, or a soft-bristled anti-static brush. Gently and carefully scrape or brush out any visible lint or dust.
- If you see corrosion or sticky build-up, it could be a sign of liquid damage and you should seek professional help.
After cleaning, try plugging it in again. If you notice the cable now clicks in snugly and your iPhone begins to boot, you’ve solved the problem.
3. Force Restart Your iPhone
When software has crashed, a force restart can revive your device, just like turning a stubborn computer off and on.
- For iPhone 8, SE (2nd Gen), X, XR, XS, 11, 12, 13, 14, and later:
- Quickly press and release the Volume Up button.
- Quickly press and release the Volume Down button.
- Press and hold the Side button until you see the Apple logo (this can take up to 20 seconds).
- For iPhone 7 and 7 Plus:
- Press and hold both the Volume Down and the Side (or Top) button at the same time.
- Keep holding both until the Apple logo appears, then release.
- For iPhone 6s, 6s Plus, or SE (1st Gen):
- Press and hold the Home button and the Top (or Side) button together.
- Keep holding both until you see the Apple logo.
Helpful tip: If your phone vibrates, chimes, or shows any change after the force restart, it’s a good sign the hardware is functioning.

Apple also provides official instructions for restarting and recovering an unresponsive iPhone, which you can follow in Apple’s support guide:
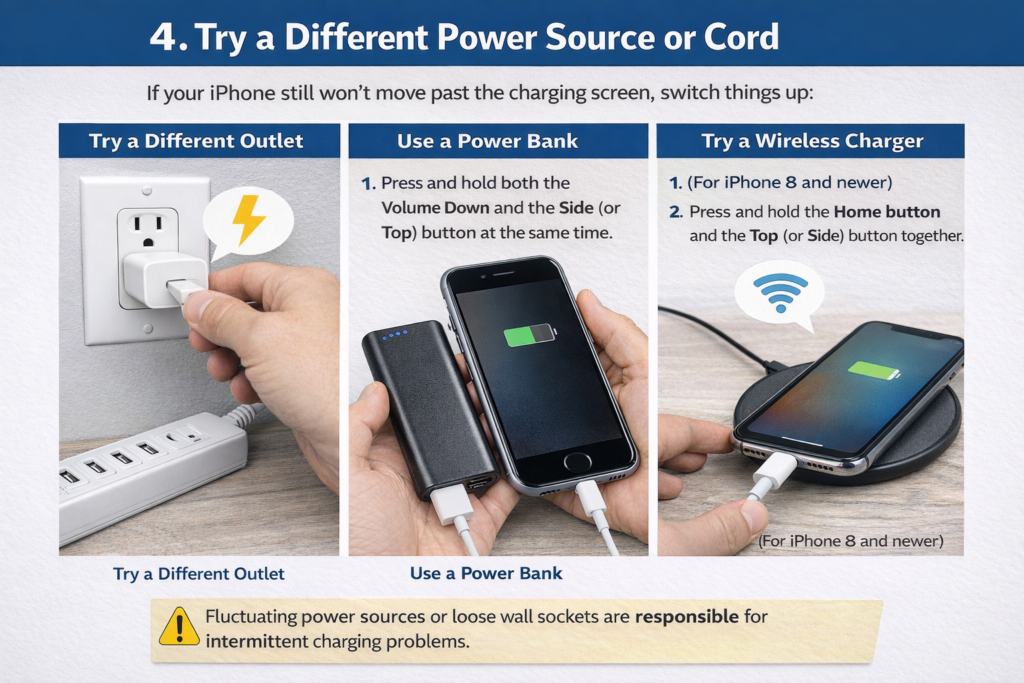
4. Try a Different Power Source or Cord
If your iPhone still won’t move past the charging screen, switch things up:
- Plug your charger into a different wall outlet, surge protector, or power strip.
- Try using a power bank as the energy source.
- If possible, use a wireless charging pad (for compatible models like the iPhone 8 and newer) to see if the issue is with the port.
Sometimes, fluctuating power sources or loose wall sockets are responsible for intermittent charging problems.
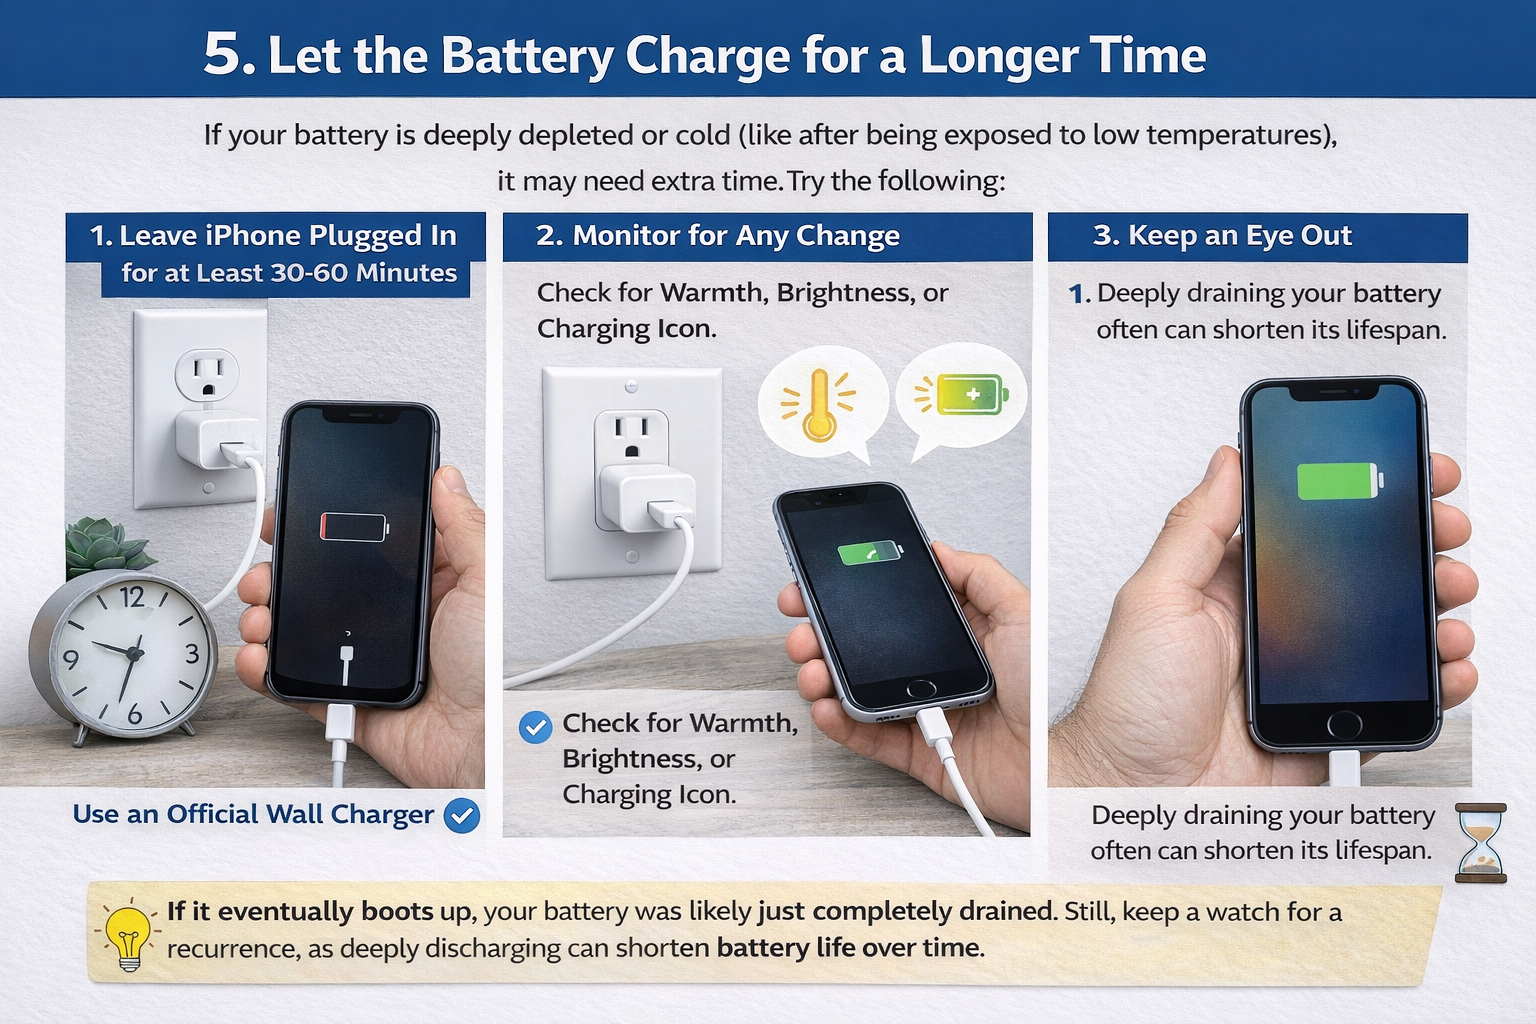
5. Let the Battery Charge for a Longer Time
If your battery is deeply depleted or cold (like after being exposed to low temperatures), it may need extra time. Try the following:
- Leave your iPhone on the charging screen, plugged into a wall charger (not a computer or car), for at least 30 to 60 minutes.
- Monitor for any change – is there any warmth in the phone, does the screen brightness change, or does it show any charging indicators?
If it eventually boots up, your battery was likely just completely drained. Still, keep a watch for a recurrence, as deeply discharging can shorten battery life over time.
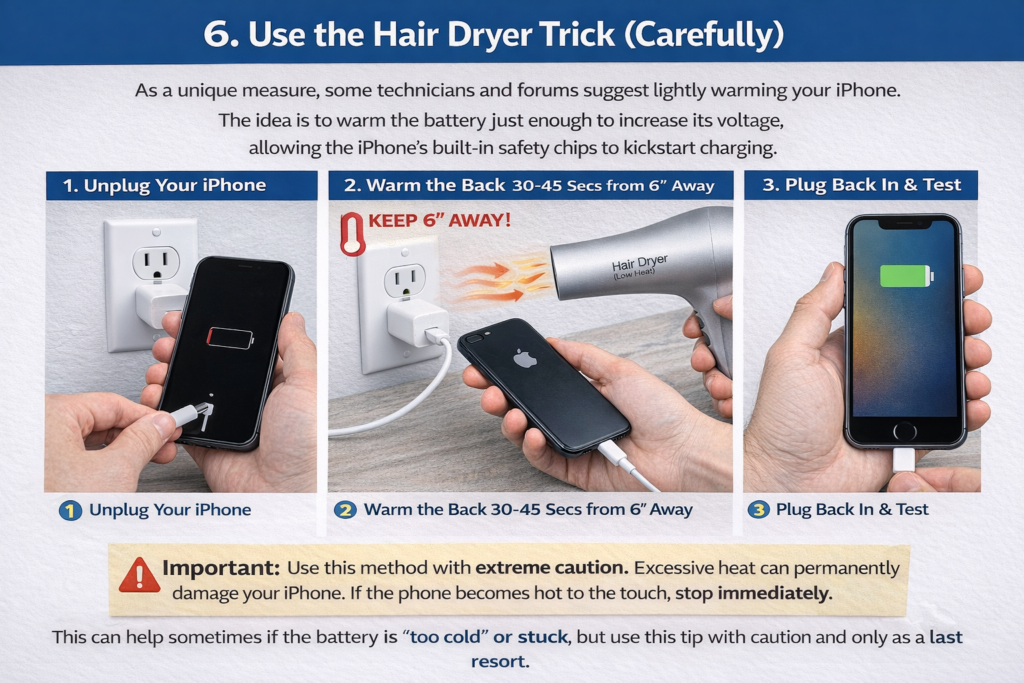
6. Use the Hair Dryer Trick (Carefully)
As a unique measure, some technicians and forums suggest lightly warming your iPhone. The idea is to warm the battery just enough to increase its voltage, allowing the iPhone’s built-in safety chips to kickstart charging.
- Unplug your iPhone.
- Set a hair dryer to low and gently warm the back of the phone for 30-45 seconds, keeping it at least 6 inches away. Make sure not to overheat it and avoid direct heat to the screen.
- Immediately reconnect it to the charger.
This can help sometimes if the battery is “too cold” or stuck, but use this tip with caution and only as a last resort.
Important: Use this method with extreme caution. Excessive heat can permanently damage your iPhone. If the phone becomes hot to the touch, stop immediately.
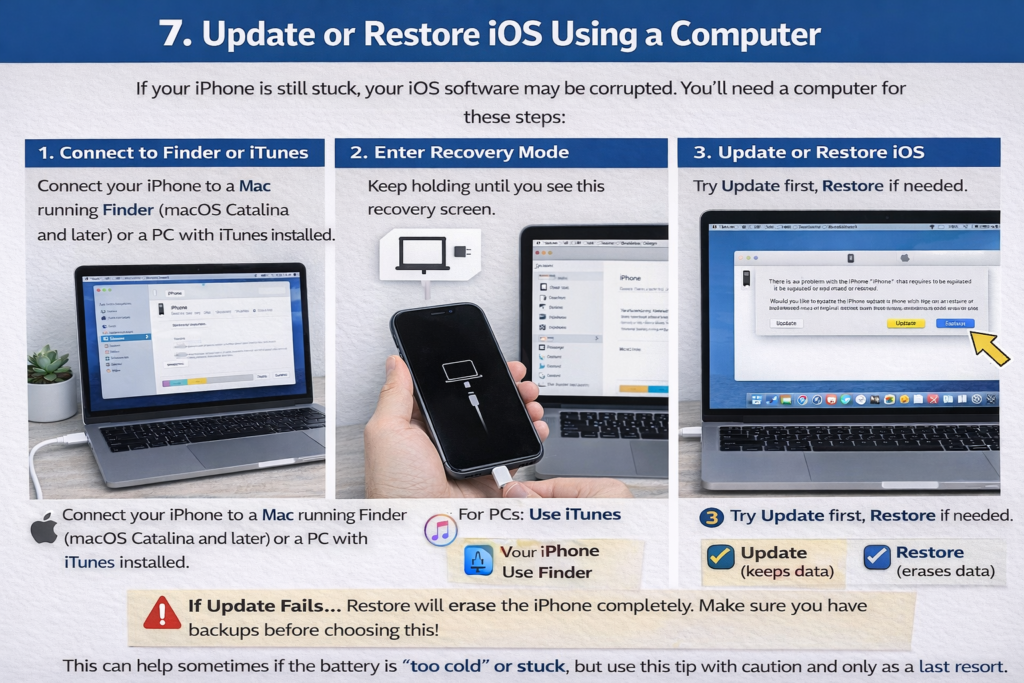
7. Update or Restore iOS Using a Computer
If your iPhone is still stuck, your iOS software may be corrupted. You’ll need a computer for these steps:
- Connect your iPhone to a Mac running Finder (macOS Catalina and later) or a PC with iTunes installed.
- Open Finder or iTunes. Look for your device – it should appear in the sidebar or top left.
- Perform the appropriate force restart for your iPhone model, but do not release the buttons when you see the Apple logo. Instead, keep holding until the recovery mode screen appears (showing the computer and cable icon).
- If your computer prompts you to Update or Restore, start with Update – this tries to reinstall iOS without erasing your data.
- If Update fails, repeat the process and select Restore (note: Restore will erase all data on the phone, restoring it to factory settings).
Doing this step can repair corrupted software and restore normal charging behavior. This parallels steps you might use for stuck screen fixes on your computer as well.
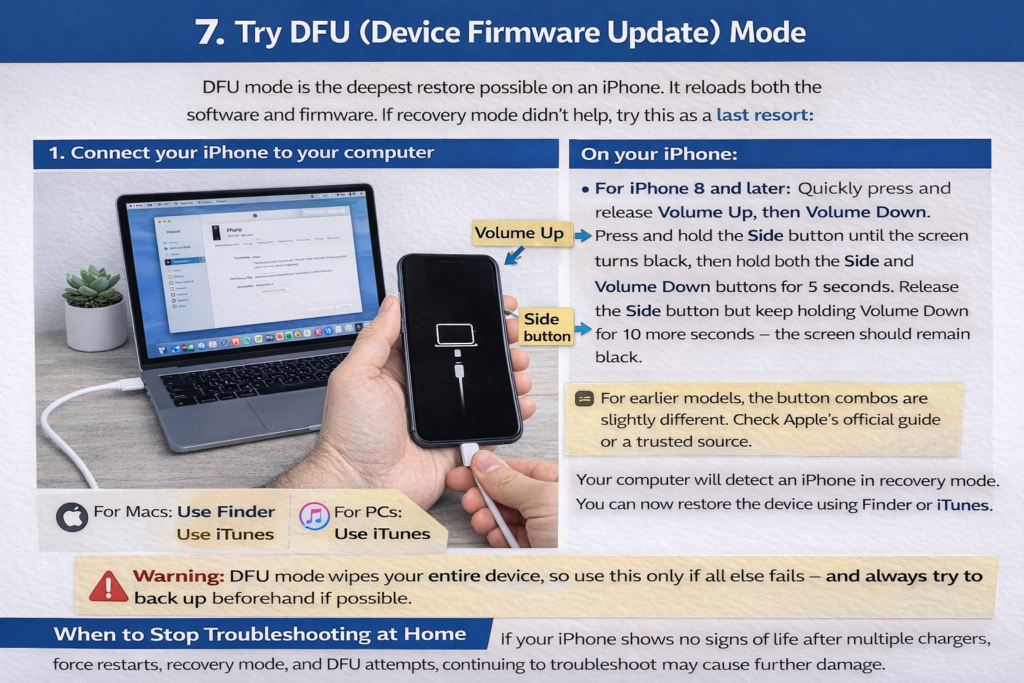
8. Try DFU (Device Firmware Update) Mode
DFU mode is the deepest restore possible on an iPhone. It reloads both the software and firmware. If recovery mode didn’t help, try this as a last resort:
- Connect your iPhone to your computer.
- On your iPhone:
- For iPhone 8 and later: Quickly press and release Volume Up, then Volume Down. Press and hold the Side button until the screen turns black, then hold both the Side and Volume Down buttons for 5 seconds. Release the Side button but keep holding Volume Down for 10 more seconds – the screen should remain black.
- For earlier models, the button combos are slightly different. Check Apple’s official guide or a trusted source.
- Your computer will detect an iPhone in recovery mode. You can now restore the device using Finder or iTunes.
Warning: DFU mode wipes your entire device, so use this only if all else fails – and always try to back up beforehand if possible.
When to Stop Troubleshooting at Home
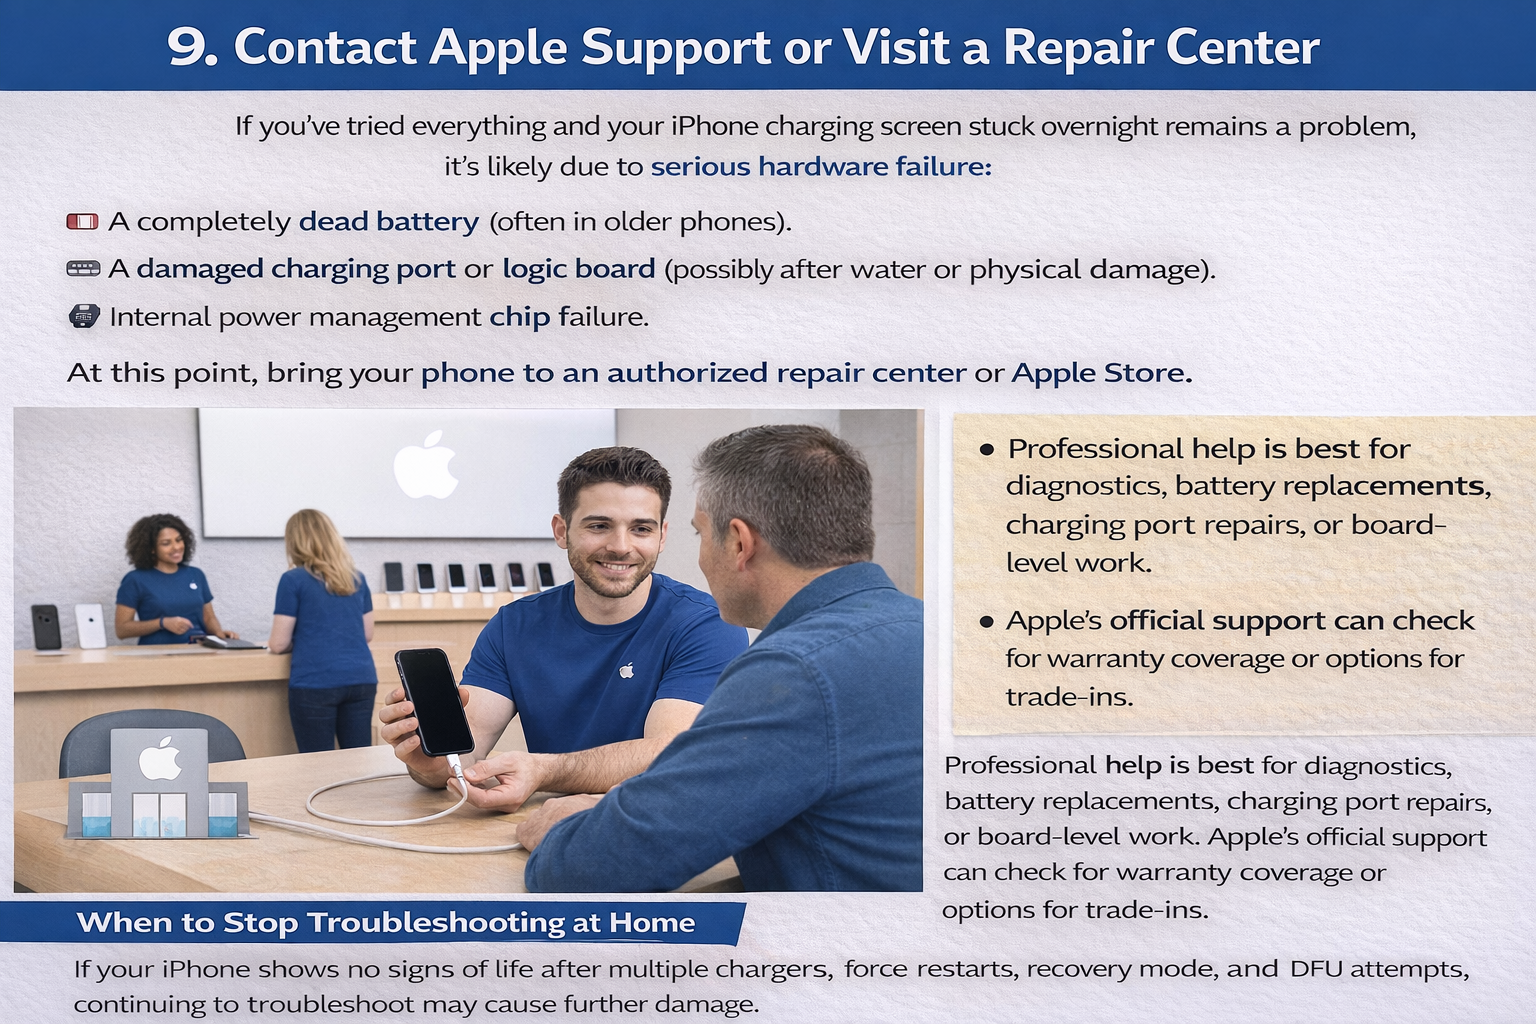
If your iPhone shows no signs of life after multiple chargers, force restarts, recovery mode, and DFU attempts, continuing to troubleshoot may cause further damage. At this stage, professional diagnostics are the safest option.
9. Contact Apple Support or Visit a Repair Center
If you’ve tried everything and your iPhone charging screen stuck overnight remains a problem, it’s likely due to serious hardware failure:
- A completely dead battery (often in older phones).
- A damaged charging port or logic board (possibly after water or physical damage).
- Internal power management chip failure.
At this point, bring your phone to an authorized repair center or Apple Store. Professional help is best for diagnostics, battery replacements, charging port repairs, or board-level work. Apple’s official support can check for warranty coverage or options for trade-ins.
Preventing the Issue in the Future
Now that you’ve (hopefully!) fixed your iPhone, let’s make sure you never have to deal with the iPhone stuck on battery charging screen again. Prevention is worth a pound of cure when it comes to electronics. Here are practical, pro-level tips to protect your phone – and your sanity:
- Invest in Quality Charging Accessories:
Always use Apple or MFi-certified cables and chargers. Knock-off accessories might be cheaper, but they can destroy your phone’s charging circuit, cause poor connections, and even risk safety. - Establish a Cleaning Routine:
Lint and debris sneak into your charging port every day. Clean the port gently once a month. A clean port is the key to a safe and steady charge. - Protect the Battery’s Health:
Try not to let your iPhone discharge to 0% regularly. Lithium-ion batteries age more quickly when fully drained or left at 100% for long periods. Aim for the “sweet spot” – keep it between 20% and 80% using Battery Health management tools. - Avoid Temperature Extremes:
Don’t leave your device in hot cars, on radiators, or in freezing conditions. Cold slows chemical reactions inside the battery, and heat accelerates wear or can even cause malfunctions and swelling. - Keep iOS Updated:
Make it a habit to check for software updates monthly. These updates contain important bug fixes, better battery management, and features that guard against charging errors. - Travel Wisely:
If you travel internationally, use voltage converters and plug adapters that are compatible with your iPhone. Unsafe power sources in airports and trains can fry charging circuits. - Handle with Care:
Dropping your iPhone can damage internal components connected to charging and power management. Always use a case, avoid sharp impacts, and keep it dry. - Monitor Charging Behavior:
If your iPhone charges slowly, contacts get hot, or charging seems erratic, take action early. Intermittent problems are rarely fixed by waiting – a quick clean or accessory swap can prevent bigger problems.
To learn more tips for keeping your electronics stable, check out these strategies to prevent freezing and general device malfunctions.
Conclusion
Seeing your iPhone stuck on battery charging screen can feel overwhelming, but with the right tools and knowledge, you can fix most issues yourself. By understanding what’s going on behind the scenes, following step-by-step troubleshooting, and taking preventive measures, you ensure your iPhone keeps working right when you need it. Remember: stay calm, work methodically, and don’t hesitate to seek professional help if hardware failure is suspected. Keeping your iPhone healthy is much like caring for a car – a bit of regular attention prevents big headaches down the road. Happy troubleshooting!
Frequently Asked Questions
Let’s wrap up with some of the most common questions about dealing with an iPhone stuck on the charging screen. Whether you’re a first-timer or it’s happened before, these quick answers may save you hours of frustration.
What should I do if my iPhone won’t turn on after being stuck on the charging screen?
If force restart and charging for an hour don’t work, try using Recovery Mode with a computer. Still nothing? This could mean a completely dead battery or hardware problem. Schedule a repair as soon as possible.
Can a faulty charging cable cause this issue?
Yes! Third-party or worn-out cables are often the problem. A cable may look fine on the outside but is broken inside. Always try a known-good cable and adapter first before digging deeper.
How do I know if the problem is hardware-related?
Try multiple chargers and power sources, clean the port, and attempt a force restart. If there is zero response – no vibration, no logo, no screen flicker – odds are the battery, charging port, or logic board needs attention.
Is it safe to use third-party repair tools or software?
Use extreme caution with third-party tools. Many “one-click repair” programs do more harm than good. Stick with iTunes, Finder, or guides from reputable sites like iFixit. For physical repairs, professional technicians are your safest bet.
How long should I wait before force restarting my iPhone?
Charge for a minimum of 30 minutes if the battery died completely. Sometimes, deeply discharged batteries need a longer time to wake up, particularly in cold environments.
Can a stuck charging screen damage my iPhone battery?
The charging screen usually indicates an existing problem, not the cause of damage. However, extreme overcharging, using broken chargers, or ignoring repeated stuck screens can reduce battery lifespan.
What’s the difference between recovery mode and DFU mode?
- Recovery mode: Loads the bootloader (iBoot), used to update or restore iOS without wiping everything.
- DFU mode: Bypasses the bootloader, allowing deeper restoration or firmware changes. This will completely erase your device.
How much does it cost to repair this issue at an Apple Store?
Battery replacements usually run $69–$99 in the US. Logic board or charging port repairs are more expensive and may not be worth it for older phones. If you have AppleCare+ or warranty, the repair might be discounted or free.
Will restoring my iPhone delete all my data?
If you choose “Restore” rather than “Update” in iTunes or Finder, all data is erased. If the phone turns on, immediately back up your information to iCloud or a computer so you never risk losing precious memories and information.
How can I back up my iPhone if it’s stuck on the charging screen?
Unfortunately, if your device won’t power on, you can’t create a new backup. This is why enabling automatic iCloud or local backups is so important – so you’re protected even during tech emergencies.
Can iOS updates prevent this issue?
Yes! Regular updates include vital fixes for battery management and charging bugs. Always apply the latest iOS version for improved stability and performance.
Are there mobile apps that can fix a stuck charging screen?
Most apps promising a “quick fix” are not reliable. Physical issues (such as dead batteries or faulty ports) cannot be solved by software. Be cautious of claims that sound too good to be true.
Why is my iPhone stuck on the charging screen?
Often a dead battery, faulty cable, port debris, or iOS glitch can cause this.
Is this safe to try at home?
Yes — except deep restore or hardware fixes; if unsure, contact Apple support.